To skip right to the code, feel free to browse the GitHub Repository
Preface + Environment Setup
I was recently gifted a Spotify Premium subscription and, as someone years behind the Spotify bandwagon, was dismayed to find that my recommendations were poor compared to that of my friends. I have spent years building and curating a music library of 1,000+ artists so I wanted to jump-start the famed “Spotify Algorithm” by following all the artists I’ve loved for so long.
Initially I considered whether I wouldn’t be able to build a simply script in BASH or PowerShell to get the job done quick and dirty, but with Spotify’s interactive authorization prompts I realized using a proper programming language as opposed to scripting would be easier and more flexible.
With a background in C# programming, but having not programmed in a little while, I decided to use Python as it would have similar syntax to C# and I would be able to get going quickly. I knew my first step would be to configure a Python Virtual Environment (venv) to keep things clean. To do so, ensure you have the python3-venv package installed:
sudo apt-get install python3-venv
From there, create your project directory and initialize the virtual environment:
python3 -m venv ./env
Before we continue, make sure to actually activate your venv by sourcing it’s activate file:
source ./env/bin/activate
(and recall you can exit your venv by calling deactivate in your shell!)
Getting Spotify Developer ID + Secret
With our environment set up we can start by creating our Spotify Developer App and get authenticated. Go to https://developer.spotify.com/dashboard/applications and click Create Client ID

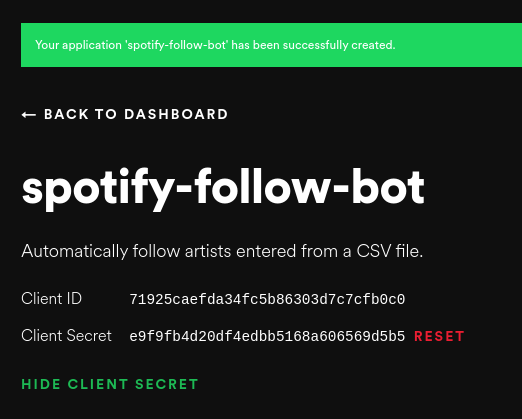
Then fill out the information for your app, confirm you won’t be charging users for using your app, and you should be rewarded with your Client ID and Client Secret!

Don’t worry, these aren’t my real ID + Secret!
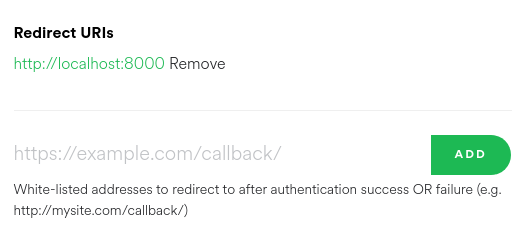
One last thing is we need to set the Redirect URI for our Spotify App. As we are building a local-only, command line application, we’ll set it to http://localhost:8000. Click Edit Settings next to your newly created Spotify App, enter the Redirect URI, and save your changes.

Authenticating to Spotify with Spotipy
Now that we have our ID and Secret, we can start using the Python library spotipy to interact with Spotify’s APIs. With Spotipy, the authentication becomes as simple as a call to util.prompt_for_user_token.
token = util.prompt_for_user_token(username, scope,
    client_id=client_id,
    client_secret=client_secret,
    redirect_uri=redirect_uri)
This will cause your shell to open a non-existent localhost page in your browser. Don’t worry, this is normal! Simply copy the URL it opened in that tab, and paste it back to your shell for the Spotipy library to parse out the required returned data.
            User authentication requires interaction with your
            web browser. Once you enter your credentials and
            give authorization, you will be redirected to
            a url.  Paste that url you were directed to to
            complete the authorization.


Opened https://accounts.spotify.com/authorize?client_id=<your_client_id>&response_type=code&redirect_uri=http%3A%2F%2Flocalhost%3A8000&scope=user-follow-modify+user-follow-read in your browser

Enter the URL you were redirected to:
http://localhost:8000/?code=<a bunch of encoded data here!>
If all went well we can check we received a token, create our Spotipy object, and start using it!
if token:
    sp = spotipy.Spotify(auth=token)
Importing our Artist CSV and getting Spotify IDs from Artist Names
Spotify’s API generally relies on the use of their Spotify IDs so after we ingest our Artist CSV file, we will need to search Spotify for the right artist and make note of their Spotify Artist ID for our later call to the Follow API.
First, we open the CSV and create a new set of found artist IDs. I chose a set to avoid duplicate entires versus a list type. We also strip out any whitespace that my Artist ID3 tags may have had.
with open(artist_csv_path, newline='', encoding='utf-8-sig') as csvfile:
    reader = csv.reader(csvfile, delimiter=',')

    foundArtistIDs = set()
    for row in reader:
        for a in row:
            a = a.strip()
Two gotchas occurred here:
- Without specifying the encoding as
utf-8-sigthe first entry in my csv would append a ‘\ufeff’ BOM to the first artist. This is likely because I created the CSV in Windows so specifying the encoding when opening the file fixes this issue. - By setting my delimiter to
,certain artists (‘Does It Offend You, Yeah?’) end up being unintentionally split. This is easy to fix with a different delimiter.
Next, we’ll search Spotify for the artist, returning the top 50 matches for any given artist name. We’ll loop the results until we find an exact match and add their Spotify ID to our set of found artist IDs.
results = sp.search(q='artist:"' + a + '"', type='artist', limit=50)
items = results['artists']['items']

if len(items) > 0:
    exactFound = False
    for artist in items:
        if artist['name'].lower() == a.lower():
            msg = 'Exact match found for: {0}\n\tartist: {1}\n\tid: {2}'.format(a, artist['name'], artist['id'])
            logging.info(msg)

            foundArtistIDs.add(artist['id'])
            exactFound = True
            break
        else:
            logging.warning('Artist returned was: "{0}"'.format(artist['name']))
            continue

    if not exactFound:
        logging.error('Could not find exact match for: "{0}"'.format(a))
else:
    logging.warning('No results for: "{0}"'.format(a))
When I initially wrote this I naively took only the first result returned, but during testing I realized I was searching for an artist like ‘Clark’ and ended up following ‘Kelly Clarkson’ – not quite what I was expecting.
Batching + Calling Spotify Follow API
Now that we have all the Spotify IDs of the artists we wish to follow, we can start calling the Spotify Follow API directly. The endpoint we need Follow Artists or Users lets us know a maximum of 50 IDs can be sent in one request. So of course, instead of calling the API once per artist, we will create batches of 50 and send them out that way.
To do so we’ll use a list and append IDs from our set of found artist IDs. Once the counter reaches our desired batch size (50), we send the batch by calling sp.user_follow_artists and clear the batch to start building the next one.
batch = list()
ctr = 0
for id in foundArtistIDs:
    batch.append(id)

    if (ctr % batchSize) == 0:
        msg = 'Sending batch: {0}'.format(' '.join(batch))
        logging.info(msg)
        sp.user_follow_artists(batch)

        # Erase the batch for next iter.
        batch.clear()

    ctr += 1
Finally, it might be that we have a few leftover artists that don’t fit neatly in a group of 50, so we check the last batch for items and if necessary send it out as well.
if (len(batch) > 0):
    msg = 'Sending remaining batch of < {0} items: {1}'.format(batchSize, ' '.join(batch))
    logging.info(msg)
    sp.user_follow_artists(batch)
Usage
Replace client_id and client_secret in spotify-follow-bot.py with your own generated values.
To call the app, run python3 -m spotify-follow-bot <your username here>
Output will be logged in debug.log and printed to stdout.
Conclusion
This was a fun side project to work on as it was something that I actually had a need for, helped me setup my Python environment and got me more comfortable with Python syntax. Spotify now lists me as following 1,200+ artists and my recommendations and upcoming concerts are much more informative than they were previously!